Truecaller is one of the best caller ID apps in the world that has features of caller-identification, call-blocking, flash-messaging, SMS, chat, voice call and much more. Now, Truecaller has introduced its own native call recording feature for Android smartphone users.
With the advent of call recording functionality in the Truecaller app, Android users don’t need to install any third-party call recording apps separately, since they are not trustworthy like Truecaller.
The call recording was a paid feature for premium Truecaller users. However, the Truecaller company is currently rolling out the call recording feature globally for all its users, except in certain countries where it is not allowed.
The call recording function is part of the latest public beta version of the Truecaller app and is not yet available for the stable version publicly. To get the recording feature in your Truecaller app, you need to enroll in the Trucaller beta program.
Truecaller’s new call recording feature allows users to record both incoming and outgoing calls on their devices. The recording gets stored in your phone’s internal memory. Truecaller doesn’t allow you to change the default storage location to external storage such as SD card. Since recordings are stored in local memory storage, you can listen to them whenever you want.
How to Record Calls in Truecaller on Android
Here are the detailed steps to record calls using Truecaller on Android devices like third-party call recording applications
As we earlier mentioned, the Truecaller call recording feature is only available for beta program users. To use this highly-useful feature, you need to enroll in the beta program. The feature’s rollout is currently in the pipeline and may take some time to be available publicly.
1. First off, install the Truecaller app from the Google Play Store and configure it.
2. Now grant accessibility permission to the Truecaller Call Recording feature by heading to Settings>Accessibility on your Android device through your phone’s settings. For some devices, it can be found in Settings>Accessibility> Installed Services.
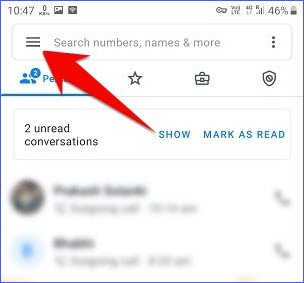
3. Next, tap the hamburger menu (three horizontal bars) located in the top-left corner.
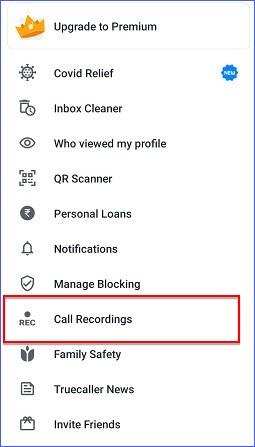
4. Then scroll down a bit and select “Call Recordings” options.
5. Finally, turn the Call recording toggle button into the on position to enable call recording functionality in the Truecaller app.
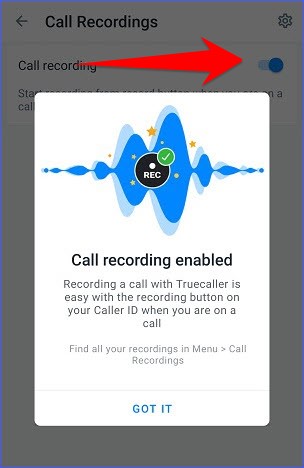
After enabling the call recording feature in the Truecaller app, you can record incoming or outgoing calls by tapping the record button from the Caller ID screen whenever you want. It is a manual call recording mode and not an automatic call recording mode.
How to Enable Automatic Calls Recording in Truecaller
In addition to the manual call recording mode, the Truecaller app also provides an automatic call recording feature. You can also activate this feature if you don’t want to tap the record button every time.
To enable auto call recording in the Truecaller app, follow the steps below:
1. Open the Truecaller app and tap on the three horizontal lines in the top-left corner of the screen.
2. Then select the Call Recordings option.
3. Now, tap on the gear icon in the top-right corner and turn on the Auto-record toggle button.
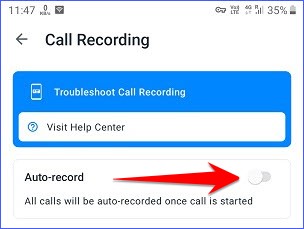
Once the automatic call recording function is activated, it begins to record incoming and outgoing calls as its name indicates.
So that’s how to Record Calls Using Truecaller on Android, if you have any further questions, please leave them in the comments area below.
If you enjoyed this post, I’d be very grateful if you’d help to spread it to your friends and family members or share it on Facebook, Twitter, WhatsApp, LinkedIn and Instagram.
To watch our tech videos, please subscribe to our YouTube Channel: Yashraj Solutions
Also Read:
How to Disable Ads on Realme Phone
How to Send Money Without Internet Using UPI


