Windows 10 is the most recent and best operating system in the market today. It is a successor of Windows 7, 8 and 8.1 and has lots of built-in features and tools that help to make the work of its users easier and faster. Even though many users don’t know they exist. A new feature in Windows 10 called Storage Sense is one of the features that is a very handy tool to get rid of unnecessary files automatically you don’t need, like temporary files and content in your recycle bin.
If your Windows 10 device is running low on disk space, then storage sense can be useful to optimize space automatically. There are many ways and third-party tools to remove junk files left behind by your apps and programs to free up disk space on all Windows systems. Unfortunately, they are not easy to use and intuitive as well.
Related Post: How to Disable Animations to Make Windows 10 Speedy
Whereas, storage sense silently monitors your computer system for unused files and proactively removes them on as per schedule. Storage Sense is an optional feature, it is turned off by default, and it turns on automatically when your machine runs out of space. You can turn it on to make your device work hassle-free.
How to enable Storage Sense in Windows 10
Here are some detailed steps to enable the storage sense feature in Windows 10
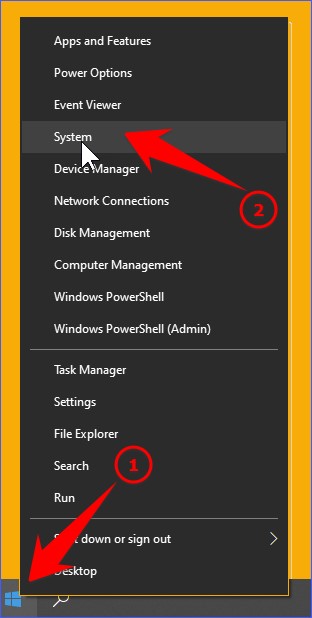
1. Right-click on the Start Menu button, then select System.
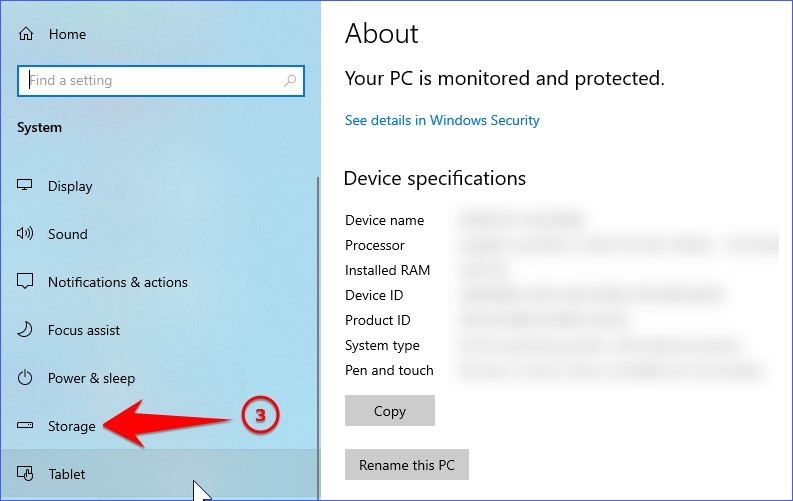
2. Now click Storage on the left-hand side panel.
3. Next, under Storage, turn on Storage Sense by switching the toggle to On position.

After turning on the Storage Sense feature, it will start to take care of temporary files and older recycle bin items.
How to configure Storage Sense Settings in Windows 10
As mentioned above, Storage Sense automatically removes temporary files, junk files and recycle bin files when your hard drive is running out of space. However, you can configure the Storage Sense settings so that you can choose how often Storage Sense will run and which files to delete automatically and which to not.
To configure Storage Sense manually, click on the link under Storage titled “Configure Storage Sense or run it“.

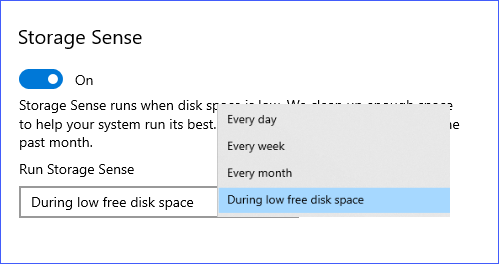
After clicking on the link, the settings page will appear, under Storage Sense. Open the Run Storage Sense drop-down menu list to select how frequently you want Storage Sense to run. Here you can choose Every day, Every week, Every month or during the low disk space. Unless you’re constantly running low on space, then the monthly option would be good to go.
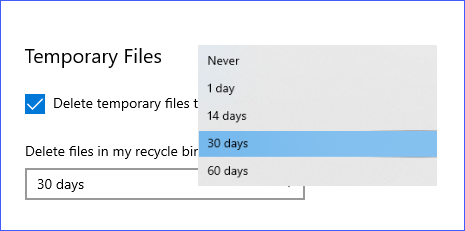
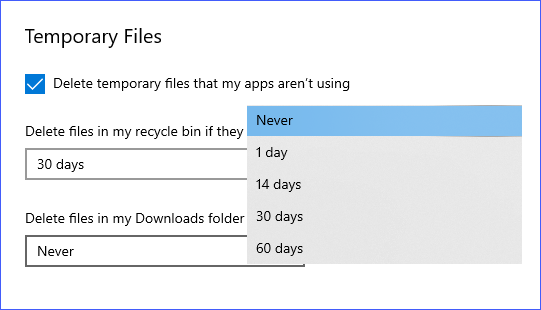
Under Temporary Files, you will see three options to reclaim free space. You can leave these settings to default, or you can change them according to your requirements. By default, the Delete temporary files that my apps aren’t using box will be checked to delete the app’s temp files automatically, and you should leave it as is. You can set Delete files in my recycle bin to Never, 1 day, 14 days, 30 days and 60 days.
By default, Storage Sense will not delete files from your Downloads folder, but you can also configure it to Never, 1 day, 14 days, 30 days and 60 days to remove old files. Leaving it as default is the best option.
If you have a previously installed version of Windows on your machine, then you have the option to remove it under Free up space now.
Whenever your computer device runs into storage pressure or the performance is not satisfactory in such conditions, you can use run Storage Sense manually by clicking the Clean Now button.
To watch our tech videos, please subscribe to our YouTube Channel: Yashraj Solutions
Also Read:
Install Software in One Click on New Windows Laptop
How to Remove Protection History from Windows Defender


