After rolling out the Secure DNS feature for Chrome Desktop, Chrome for Android is now getting the Secure DNS feature for a safe browsing experience. Following Google Chrome’s browser, Microsoft Edge is constantly gaining popularity day-to-day on the grounds of some brilliant and handy features, and it is now on 2nd rank. Google Chrome doesn’t seem to lag behind in the race for the most secure, fast and user-friendly browser.
Google is facing significant competition from the Chromium-based Microsoft Edge. In response, the tech giant is working diligently to introduce useful features and tools. These updates aim to enhance the user experience and safety while browsing.
Secure DNS is one of the best features that helps keep you safe and secure while surfing the web. Secure DNS over HTTPS (DoH) protects you from third-party sites that redirect you to phishing or malicious sites. Previously, this feature had to be enabled through a hidden flag in Chrome 80. Now, with the latest version 85 of Google Chrome for Android, it is being officially rolled out to everyone.
Related Post: Google Chrome Rolling Out Secure DNS for Safe Browsing
According to Cloudflare Unfortunately, by default, DNS is normally slow and insecure. Your ISP and anyone else spying on the internet can see every site you visit and every app you use – even if their content is encrypted.
In other cases, some DNS providers sell data about your internet activity or use it to target you with ads.
Before we begin on how to enable third-party secure DNS, make sure that you have the most up-to-date version of Google Chrome on your phone.
Here are some easy steps to enable Secure DNS in Chrome for Android.
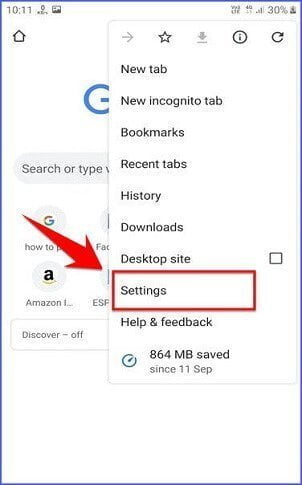
1. Open the Chrome app if you haven’t already, then tap the vertical three dots (⋮) icon in the top-right corner.

2. From the list of options, choose Settings.
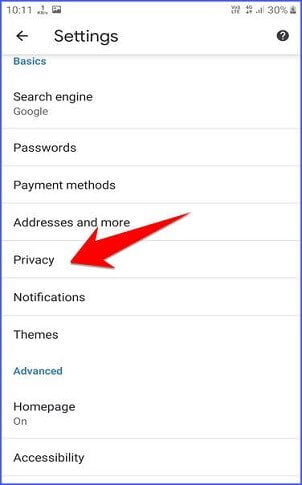
3. Now look for the Privacy option, then simply tap it to open it.
4. Next, you’ll be presented with a new Privacy page, now tab on the Use secure DNS option from the given options.
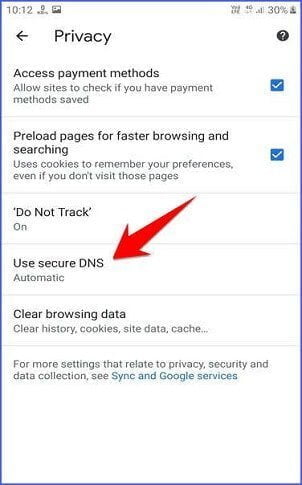
5. Secure DNS over HTTPS (DoH) will be enabled by default using your existing internet service provider (ISP) to process domain requests. But the default DNS may not be available all the time to protect you.
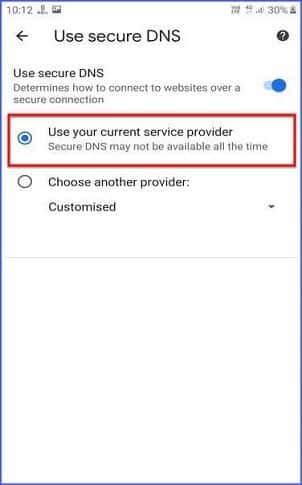
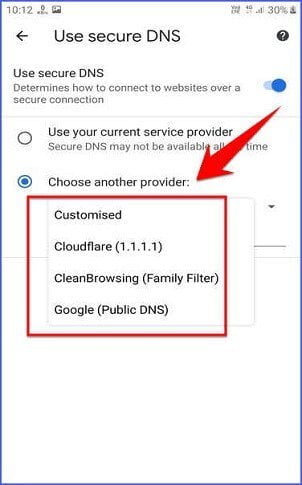
6. If you want constant protection while surfing. Then you can select other third-party trusted DNS resolvers including Google Public DNS (8.8.8.8), Cloudflare (1.1.1.1) and CleanBrowsing (Family Filter). Not only that, you can also set up a custom DNS service provider if you’d like.
That’s all!
We hope this article helped you learn how to enable and use Secure DNS for safe browsing. If you still have any doubts, you can drop your queries below in the comment box.
If you enjoyed this post, I’d be very grateful if you’d help to spread it to your friends and family members or share it on Facebook, Twitter, WhatsApp, LinkedIn and Instagram.
To watch our tech videos, please subscribe to our YouTube Channel: Yashraj Solutions
Also Read:
Caret Browsing in Firefox: How to Enable or Disable
Most Secure and Private Browsers


